Contact Me

Use the form on the right to contact me.

Also you can use any of this specific adress:

web@jordalefou.com
training@jordalefou.com

44 Avenida de Menéndez Pelayo
Madrid, MD, 28007
Spain

034679665020

# Blender # Nuke # Fusion # Tips&Tricks

This section provides some tips for using Blender and Nuke software by jordal

/ Welcome Rocky Linux

Jorge Vidal


After several years using Centos, it is time to upgrade to Rocky Linux. I will share my experience here, regarding VFX use


/ Installing Rocky Linux (v9) easy and fast


Just download ISO, boot and install. Same instructions as Centos, but a more likeable interface.

Regarding partitions we have same trouble as Centos. Automatic partition just will keep 70 GB as root, so I recommend to increase it at least to 100 GB to avoid the annoying issue regarding lack of space when you need to install strong software as DaVinci, etc.
In case, 70GB looks enough if you manage your apps and temporal files.

I recommend to have an external disk for apps, this way you don´t need to reinstall any time you have a crash or an update. Some apps can be executed using alias, so I manage them outside root disk and I can run same on different linux as they share code. Each three months aprox you will need to upgrade, so this way I can just use the uncompressed folder and upgrade my alias without needing to delete older versions or fight against elements. On my post regarding .nuke desktop I explain how to do that.

As first look Rocky looks like a Mac Os, very beatiful and fast. Lots of ready to use apps preinstalled.

You can have a little headhache installing your Nvidia drivers. By default nouveau driver works fine, but definetely you will need to upgrade your drivers to manage CUDA or other needs as DaVinci asks, etc.

Here is a fast guide and some websites for reference.


  1. It is need to have nvidia working (I’m using GTX SUPER 1660).

    Best way should go to Nvidia web, but you can manage to get it faster from alternative sites as sometimes you would need additional packs. This web down worked to me:

    https://tutorialforlinux.com/2019/12/13/nvidia-gtx-1660-super-centos-8-driver-how-to-download-install/2/

  2. Enable Rpm Fusion Repository

    Here you can find another guide to get this repo:

    https://www.linuxcapable.com/how-to-install-rpm-fusion-on-rocky-linux/

    sudo dnf install --nogpgcheck   
    
    https://mirrors.rpmfusion.org/free/el/rpmfusion-free-release-$(rpm -E %rhel).noarch.rpm -y
    
    sudo dnf install akmod-nvidia
    
    nvidia-xconfig
    
  3. For running DaVinci you also will need libGLU

    https://rockylinux.pkgs.org/9/rockylinux-appstream-x86_64/mesa-libGLU-9.0.1-6.el9.x86_64.rpm.html

    dnf install mesa-libGLU

It can happens that upgrading Rocky you would need to reinstall nvidia drivers. This happens because cuda would need a kernel update also.

After upgrading Rocky you can get down your x screen configuration. My nvidia-xconfig didn´t worked and it didn´t detect my card despite everything was working previously.

To avoid headhaches, best way is to have downloaded the latest nvidia driver to an accesible folder and reinstall or upgrade from terminal. I create a dir named NVIDIA at home and there I keep my latest drivers, then I can run by terminal faster, just straight:

 ./NVIDIA-Linux-x86_64-535.86.05.run

Depending on your boot configuration it cannot be done automatically.


After upgrading your Nvidia you can run the DaVinci installer and everything will go ok.

Blender 3.5, Nuke, Natron, etc. keeps working same as Centos 7 without issues. In case of Blender 3.5 as it has some lib requests looks running better on Rocky.

So this is my fast guide. As usual I will update my experience along the next months flagging any issue.

Thanks Rocky people!


/ Nuke to Fusion (fast guide)

Jorge Vidal

(Updated April 2023)


As Nuke is becoming pretty expensive, I’ve licensed a Fusion/Resolve which reminds me my old Flame/Smoke workflow


/ Pros and Cons

I did two Portugal Tv movies around 2010 just using Autodesk Smoke.
It was great to do color grading and doing all the vfx and title design inside a single app.


The advantajes on this system is that you have your timeline and you can store any vfx at any clip cut at once, including motion graphics or any magic touch required. This is fast and useful when you have a lot of shots to do and you are the only artist, as it was to be in the old times, mostly in advertisement.

This all in one philosophy was implemented in Nuke Studio but I don’t know who is using it. Probably as Nuke Studio is a slow player and just used for conforming and export. Instead Flame/Smoke always have been the best for real time as they use to be driven by a single artist and before 2010 aprox mostly of the old material use to be ingested by tapes. From 2012 aprox. Flame become a all in one, including Smoke full editorial interface and Lustre for color grading etc. This “all in one” phylosopy, blending editorial and finishing, has become kind of standard on all the “Studio” packages (Nuke Studio, Flame Premium, Resolve, Adobe Studio, etc.).

There is a contradiction in the thing that for complex productions, the Studio packages are just used for conforming or playing the clips. As I’ve say, Nuke Hiero was designed to replace Flame, but nobody use it as standalone Vfx station.And sadly in most of the companys Flame become just a “player” as general vfx work was done in Nuke by individual artists, now the standard. Now we also have several image sequence players as Rv or Shotgun for show playlist to clients, so this “on suite” to do vfx and “show it” belongs to dinosaurs nowdays. What’s the point then regarding have a Studio software? The point is: for supervision and for use as small studios or independent artists.

Davinci Resolve Studio can be used instead of Autodesk Flame. Is cheaper and worth. And can be used instead of Nuke, as it has also python, camera tracker, particles, etc. But this use is a recomendation for small studios or single driven artist.

I will test it and watch pros and contras. This is a work in progress list, so will be updated.


Contras:

  • The big lack regarding Fusion compared to Nuke is the color managment. Sounds crazy as DaVinci is a color industry standard, but the thing is that color managment for comp requires a more easy workflow when you share different medias which is one of the strongest skill in Nuke.

  • The other big lack is regarding Deep compositing, but this is used only in big film studios as Weta, etc.

  • Less powerful channels and layers workflow. This is mandatory for strong pipeline workflow in big studios.

Pros:

  • Very good for broadcast Graphics and Titles.

  • Very fast for checking material and color dev.

  • Good for basic channels and layers as you can use timeline combined with Fusion.

  • It is possible to create a complex pipeline workflow using Cloud.


/ Preferences

Here you can find as first step a way to mimetize Fusion closer to Nuke. These are Alan Bovine preferences, thanks to him you can start working fast.

It is a good idea to set up the preferences close to Nuke to being more familiar driving the software. Here are the steps.

  1. You need to go to preferences.On top menu, go to “Fusion” and there to “Fusion Settings”, will open a big window where are system preferences and user preferences.

  2. You can choose user preferences and click on NEW button.

  3. UserPath” will be written instead of “from”.
    This way you are sending your preferences to this folder, instead of your home folder.
    Of course you can use any folder you want, for this example I’m gonna use “nuke2fusion-master” which will contain all my setups.

  4. Instead of “to” paste your downloaded folder (“nuke2fusion-master”). This can be a little confused as you need to put the path and delete the “to” and “from” from the text box, I mean: replace by your paths.

  5. Don’t forget to SAVE and check that path is stored.

  6. After that what you will have on restarting the software “nuke2fusion-master” folder is becoming your main data for preferences, where you can have also all your LUTS, layouts or macros.

  7. Finally copy the specific files from nuke2fusion folder to their correspondence preference folder, example: fusion.fu goes to :Config. This are the ready to use preferences, do a copy and reserve the originals for the future.

    If you store this in a portable disk you can have with you anyplace and will survive any software update. I’m linux user, so from time to time I need to update my OS. As Resolve is a little “special” reggarging backups and preferences, I feel better having this folder under my eyes, avoiding hidden folders or user data stored close to root.

    NOTE: there are two different folders:

    “:Config” wich is for regular version and
    “s:Config” in case you are using Studio Version.

    This is important as your preferences will be different, so maybe you would need to use the “s:” version if you have license.
    In my own I use Studio version, but also have Fusion Standalone, which is useful just for comp and more stable. Both version have independent installers so keep it in mind. I duplicate my files for both set of preferences, as you can see in last screenshot.

  8. As a special bonus, I recommend also to store your temporal data in another disk. I use always a cache disk. Same for Nuke. As Centos root disk can be easy filled and play against you. I’ve redirect the Temp path to my own cache disk. Remember: once thing are preferences, but other are cache or video data.

As extra step, you can use “octogonal pipes” in your flowchart, less annoying than the default ones. Also you can use similar “dots” for nodes connection as in Nuke, using “.” .

If you are linux user and wanna scale up your UI, here is a very interesting tip using the .desktop file.

Thanks to John Been and Shane Milton


/ Saving Fusion Comp from Davinci as external

On using DaVinci Resolve it is common to create a “Fusion Comp”.

This is an equivalent to script comp in Nuke Studio or a DVE/Action in Flame and Smoke. It creates an empty clip ready for comp, useful if you wan to start from scratch.

You can drag this empty clip to your timeline and jump into using the “fusion”icon.

Once in Fusion desk you can select any node and go to “settings”, from there you can “save as” your fusion comp as an independet file, this way you can open it on Fusion standalone version, or just to have a backup sepparated from your Resolve project file.

Process is similar to copy-paste on Nuke, as all nodes are scripting text.


/ Matte and ALPHAs kaos


Looks understanding the matte workflow in Fusion is pretty hard.
So here a fast note about it:

  • Use grey, blue or white entrys for mattes

  • and the node “matte control”

Looks like Fusion uses Yellow as Bg and Green as Fg. For mattes use the other entrys and you can tune up your matte using the matte control.


/ Show thumnails

As you can see, using right button you can show thumnails and you will get similar picture in the nodes as Nuke.


/ Python for Fusion


A few info online compared to Nuke and less use of scripting in Fusion, but here you can find some useful links:

Python Script Snippets for Fusion TDs

wiki


/ TIPS for saving time in DaVinci Resolve


Very nice tips on this video that will speed up your workflow

/ USD support

From v18.5 we can import USD files which looks very nice and fast.
I will upload some tips further about how to improve your workflow between blender and Fusion.


/ xStudio from DNEG released as open source

Jorge Vidal


The open source beta version of xSTUDIO is available now at https://github.com/AcademySoftwareFoundation/xstudio.

For more information about the application’s features and capabilities please visit www.dneg.com/xstudio/.

To get involved in the xSTUDIO project, visit http://openreviewinitiative.org/.


/ Grease Pencil Add-ons for Animation (Blender)

Jorge Vidal


Here you can find some interesting add ons developed at this french Animation Studio Les Fées Spéciales.
I notice them watching Amélie presentation at the Blender Conference 2022.

You can find the sources here:

This is a list of some of the most interesting add ons an a quick review. Will keep updating while testing them.

  • A color palette for quick pick up materials

  • A multiplane cam creator (2d GP layers)


SPA Studios' 2D Animation Toolset


Another strong recommendation is the Spa Animation Studios blender extension, which is an optimized fork for drawing in a more natural way, plus some extra additions for storyboarding.


How to animate on TWOS


Last ones is a tip from Cloud Blender about how to animate in TWOS.
The easy way is showed in this video, just adding an Stepped Modifier to your curves.


/ Blender Essential Texturing Tips (Blender)

Jorge Vidal


Yes texturing cg is a nightmare, but you have some add ons for Blender that should improve it, so here are my own recommendations:


  1. Texture Tools (free). For UWrap like 3dMax, by Hendrik-Jan Schoenmaker.
    Also on this web you will have complete documentation. Very complete toolset.

  2. Super-,Anti, Anti Bundle. Very useful add for work faster tilt.
    blendermarket texture-tools (18$ aprox)

  3. Node Wrangler (free).
    Essential and free of chargue.
    Main shorcuts:

    • Alt-S swap links

    • Shift-Ctrl-LMB Preview Node

    • Ctrl-T Add Texture Setup

    • Ctrl-Shift-T Add Texture Setup from Folder (PBR selected and all pass)

    • Alt-RMB-arrastrar Connect Nodes

  4. BPainter. It helps to work materials and textures as layers. Basic, but useful. You get much more control on paint brushes and texturing.
    blendermarket bpainter (40$ aprox) .
    Update: don´t work in Blender 4, maybe in standby, but you can keep working textures in previous versions and export using same uvs.


/ Linux unzip archives all at once (Centos)

Jorge Vidal


Sometimes I use to download several compresed files. Using Ark or Archive Manager applications in graphical mode means lost my time and patience, so I do it this way:


  1. Download material.

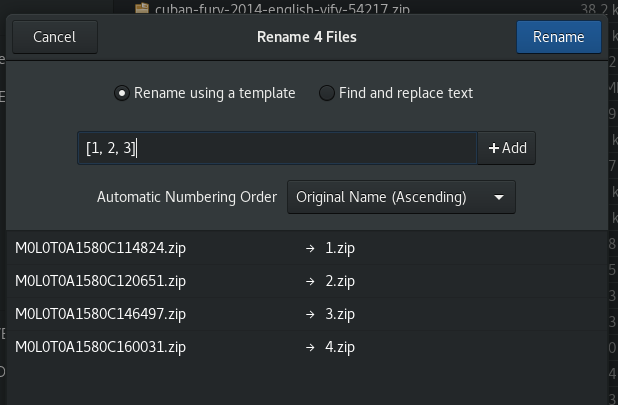
  2. Select ALL archives and rename them all at once (hotkey is “F2”) using “automatic numbers”.

    This is not necesary but this way you can check that all your desired downloads are unzipped “following an order” which is useful when you have different named folders and can lost the track easy.

  3. Open console (RIGHT CLICK “Open in Terminal”) and type :

unzip “*.zip”


/ Linux Best HOT Free Software (Pipeline)

Jorge Vidal


Here is my HOT software list for a full Vfx Studio, ALL for FREE in Linux.


Sound

  • Ardour for Sound, is an alternative to Adobe Audition, Nuendo or similar.

Video

Graphic

2D Animation

  • OpenToonz for traditional animation.

  • Wick as a simple Flash, also Synfig: Alternative to Adobe Animate/Flash

Text

3D

Virtual

  • VirtualBox for emulate another OS, including MacOs or Windows.


/ Nuke Launcher for Linux (Centos) (.desktop)

Jorge Vidal


Installing Nuke on Linux doesn’t provide the icon launcher you have on Mac or Windows.

But you can manually create it.


I recommend this tips but you can go to step 2 for shorter version:


/ First of all. Create an alternative Nuke path.

  • I use to install the Nuke App outside my main local disk.

    This way I get a faster and better gestion on upgrading every three months and save more space.

    So, in my Workstation I download the .tgz compress app in my SSD (named SDT01)

    and this will be my Nuke folder:

    /run/media/user/SDT01/00_Apps_Backup/02_Nukes/Nuke13.0v2/Nuke13.0


    If you don’t wanna do the same, just keep in mind the path you have on installing nuke.


/ 1. Editing my bashrc


Then I get this path line (/run/media/user/SDT01/00_Apps_Backup/02_Nukes/Nuke13.0v2/Nuke13.0)
into my .bashrc script (located in my home folder) here:

/home/user

and write down as it drives my Nuke directory:

alias n='/run/media/user/SDT01/00_Apps_Backup/02_Nukes/Nuke13.0v2/Nuke13.0 --NukeX -nc'


Creating this alias I can launch nuke just writing “n” on my console.

This is just useful and faster, and you can create your own alias, as “patata” or “sugarbaby” instead “n”

NOTE: For watching on graphical mode the .bashrc script, use COMAND + H, because is hidden by default.


The launch comands provide you different calls to Nuke and the way you wanna launch the application.
Also you can use it for launching Hiero, Nuke, Nuke X, etc.
I’m using Nuke X in non commercial mode (—NukeX -nc)
Go to the foundry for specific launch comands, or just remove -nc at the end.


/ 2. Creating my .desktop launcher

Now, I’m ready to create my .desktop launcher.

The .desktop launcher will be another script you need to create as root into this folder:

/usr/share/applications

This way you are creating a link to the app using a desktop icon as windows or Mac.

(Also works in any directory, so keet it in mind, you need to mark it as TRUST and Allow executing file as program )

The right way to write the file is:

[Desktop Entry]

Name=Nuke.13.0v2

Comment=Nuke desktop shortcut

Exec="/run/media/user/SDT01/00_Apps_Backup/02_Nukes/Nuke13.0v2/Nuke13.0" --NukeX -nc %F

Terminal=true

MimeType=application/x-nuke;

Icon=/run/media/user/SDT01/00_Apps_Backup/02_Nukes/Nuke13.0v2/plugins/icons/NukeApp48.png

Type=Application

Categories=Graphics;2DGraphics;RasterGraphics;FLTK;

Name[en_GB]=Nuke.desktop


As you can see, I’m writing my path on the Exec line.
Write your OWN real path, and name correctly your Nuke version. On updating Nuke you must to do it recursively.
(Remove -nc if you have license and don’t forget the %F at the end.)

Ok, now log out, this way you will get the changes on your App launcher.


NOTE: This .desktop file can be also created at ~/.local/share/applications in case you have differente users.
Take in mind that on launching the .desktop as root, you will be root user using Nuke. It is preferible to run it as another (non root) user, with non-Administrative privileges.

The .desktop file also can be pasted on your Desktop, this way you can grab your script to the icon and Nuke will open it.
As you can see, it works at any place. But because it is executable file you must take care of the permissions.

/ 3. Open scripts directly in graphical mode

Last step is go to your graphical and click one .nk script + right mouse button and select Open with Other Application.
If your Nuke.desktop is right you can find Nuke in the list and select as default launcher for .nk files.

Easy!!! Now every time you double click on .nk will open the app.


/ 4. Set your mine list

Some times, the .nk file is not recognizable by Centos, then you must edit the mine list.

The mine list is which tell Centos that Nuke run .nk files.

Your .desktop file will work without the mine list, but is better to have it setted.

Here you can find the right way, at The Foundry. I’ve screenshot the main instructions.


/ Final thoughts:

Of course, you can use this tip on any application, as Blender.desktop.

Manage your apps in external drives, much more easy to update.

In opposition they can made your workstation more vulnerable, but you can solve it adjusting privileges.


/ VFX Good Night Reading (Pipeline) and More

Jorge Vidal


Here is an amazing link for TD and Pipeline Artists, a compilated archive full of sources about free software and articles.


If you are interested in development for CG and VFX take a long view.

vfx_good_night_reading


And here, a complete list of Open Source for Pipeline.

Pipeline:

• Prism-pipeline: https://prism-pipeline.com/​

Project Manager:

• Kitsu / CGWire: https://www.cg-wire.com/

Render Farm:

• Afanasy: https://cgru.info/
• OpenCue: https://www.opencue.io/
• Crowdrender: https://www.crowd-render.com/
• Polargrid: https://polargrid.space/


The VFX Reference Platform is a set of tool and library versions to be used as a common target platform for building software for the VFX industry.

vfxplatform calendar


/ Full Root Partition - tip for manage temporal files (also Nuke tip) on Linux Centos

Jorge Vidal

(updated September 2022)


A fast way to avoid full root partion due to lack of space on older Centos.


/ First look

If you use automatic partitions on installing Linux Centos you get annoying messages soon about being full on /root .

On my workstation it was set around 50 Gb.

df / -h
/dev/mapper/cl-root   50G   28G   23G  55% /

Sooner or later you would need to search a way to resize your /root which is irritating.

So I wanna share a small TIP. This way you wouldnt need to resize anything.


/ Check your troublemakers first:

First of all you must look as superuser whose are the main folders you use to get full recursively:

du -h --max-depth=1

If you prefer a graphic way use as user:

babobab

This way you can see graphically which are the most heavy folders that need to be cleened up.

Usually you will notice some folders whose are recursively filled by data and you need to recursively empty from time to time.
The global temporary directories are /tmp and /var/tmp

I use to play a comand for empty this files

rm -rf ~/.local/share/Trash/*
rm -rf ~/tmp/*
etc

But again an againg you lost your time removing trash so, what Ive done is very simple:

This is useful but just for temporal or shared folders, caches, etc. ; not a great idea for important root folders as it can do some damage or vulnerability to the system (you will see on rebboting).

I just use it when some apps download their cache data to root partition instead of my default user; this use to happen on installing as root or by managing preferences in a bad way.

A good example: Firefox downloads and Firefox cache. You can set up your download directory in preferences,
but there is also a caché folder which goes to /tmp/mozilla_user0 so I use my tip on this one also. When I dowload a lot of data I don’t want to full my root drive.

So now we go to a very simple tip:

/ TIP, move /tmp folder to another disk:

Look for your /tmp folder from your root partition.

/tmp

Copy that tmp folder at your /Documents or any place you prefer, or create one from scratch.

/home/user/Documents/temporalRoot/tmp

Create a “tmp” folder alias (dynamic link in linux) and place it where root use to have the original folder.
You will need first to delete the original one in /.
As simple as it is: you are linking the data to other drive area.

Finally manage permissions by chmod 775 or whatever you need.

chmod 775  /home/user/Documents/temporalRoot/tmp

Generally there is some confusion about permissions, so you need to know:

There is a root folder (generally /tmp, which belongs to root)

There are other user folders (inside /tmp we can have user folders)

For example in case of Firefox, it will be the user folder, as it is user who has the right permissions (can write and delete, etc).

d rwx --- --- 2 user user mozilla_user0

In case of nuke folder should be similar: but due to license, nuke can be owner by user or root, so maybe you are running the app as user, but the real owner is root.


/ TIP for NUKE USERS:

When you run Nuke on first time, cache derivates to root device so usually this goes to /var/tmp/nuke-u100 so, any time you reinstall a new version you need to check that folder.

Very often this folder gets full and freezes your system while your /home user folder keeps being full of space.

I have a dynamic link on my root partition, so the temporal data goes to my home.

/home/user/Documents/TemporalRoot/nuke-u1000

Now my root partition use to get enough space and I can empty my temporal folders as non root user.

In case Nuke crashes or you would get an update, your cache won’t fill your /root partition if you forget to set up the preferences, because it will always search this folder.

I setup my permisses on this nuke-u1000 as:

d rwx rwx r—  7 root root  nuke-u1000


You can check your nuke default cache location in your preferences.

Nuke default cache location

Linux and macOS:

"/var/tmp/nuke-{uid}/" 

where {uid} is the users user ID on the machine, e.g. /var/tmp/nuke-u1737/


And here a reminder about permissions:

rwx = 111 in binary = 7
rw- = 110 in binary = 6
r-x = 101 in binary = 5
r-- = 100 in binary = 4

/ BONUS TIP: remove old kernels

As additional tip you can also remove all older kernels.

Centos keeps updating all the time, so at the end of the year you have lots of updates filling space. A way to clean them up is typing the next commands:

# list actual kernel
uname -a

# list older kernels
rpm -q kernel

# remove all except latest 1
package-cleanup --oldkernels --count=1


/ Lock Grease Pencil to Cam (Blender tip)

Jorge Vidal


Some times you need your drawings to be ALWAYS locked over the top of your layers. One way to do this is linking the Grease Pencil to your Cam using an object constrain.


How ?


Use any Cam. ( Preferible Add Camera Rig from this addon here )

  1. Create a Grease Pencil.

  2. Add an Object Constrain: Copy Transforms

  3. Target: your Cam

  4. Set: Before Original (and reposition your Grease Pencil in frame if you need for fix offset).

  5. Now you can draw in camera view. GP will follow any mov.


Why?


It is useful for loops, walking cycles and background pans (traditional animation way).

This way your Grease Pencil Object is always in the same local space. You will get all the drawings like in a cell pivot.

You don´t need to animate your GP Object. because it always follows the camera (again the walking cycle).

And you can use the Camera Motion Blur.


Bonus Tip:


Check “In Front” on your Grease Pencil Viewport Display (Object Properties) and no worry overlaping elements.